Path of Exile 2 patch 0.3 – The Third Edict launches tomorrow, and many players are preparing to dive into the new campaign. If you aim to reach maps faster or even attempt a campaign speedrun, the key is not just grinding harder but learning smart tricks, proven strategies, and practicing the right way. With a few adjustments—like picking a strong build, upgrading at the right breakpoints, and avoiding unnecessary side quests—you can dramatically increase your leveling speed.
This PoE 2 campaign guide covers essential tips for faster progression, helping new and experienced exiles save time, survive tricky encounters, and quickly hit endgame content. Whether you’re chasing a speedrun or want a smoother league start, these strategies will put you ahead of the pack.

Tip 1: Know Your Build
The first and most important tip is to know your build. Don’t improvise at league start—choose a proven build or design your own and practice it at least once throughout the campaign. This way, you’ll become familiar with your gem setups, when to allocate passive points, and when to look for vendor upgrades such as weapons, new base types, and movement speed boots. Mastering these details will significantly speed up your progress, as you won’t need to pause to read, check the gem tab, or hesitate—your actions will become automatic, which is the biggest boost to efficiency.
If you need a build guide for league start, you can check out Mobalytics. It shows the type of gear to look for early on, which gems to equip, and which passive points to take later, guiding you step by step through the campaign (e.g., level 14, level 33, and so on).
Tip 2: Learn the Campaign
The next key point is to know the campaign. This doesn’t mean memorizing every layout—you don’t need to go that far. What really matters is understanding which quests are essential. Some provide powerful permanent rewards, such as +30 to attributes or extra skill points. Others, like smaller side quests, can reward you with useful bonuses such as support gems or Jeweler’s Orbs, which help you maintain momentum as you progress.
If you’re following a build to learn gem setups, it’s equally important to keep track of the quests you should complete along the way. Mobalytics offers a detailed campaign guide that highlights which bonuses are worth pursuing. At the bottom, there’s a handy cheat sheet summarizing the most critical quests—like Books of Specialization that grant +2 passive points—separating the essential ones from the optional extras. Learning these beforehand ensures you won’t waste time on unnecessary side quests that don’t benefit your progression.
Tip 3: Campaign Layouts
If you want to take things to the next level, you can start learning campaign layouts. There is a layout guide, though some parts may need updates since layouts tend to shift slightly each league. Still, many of the tips remain relevant and can help you progress through the campaign more quickly.
Another great resource is the Campaign Codex Discord, which has nearly 2,000 members working to decode campaign zones and discover the fastest ways to navigate them. If you’re interested in mastering layouts and optimizing your pathing, joining this community is the perfect next step.
Tip 4: Movement Speed Boots
One simplest yet most effective way to speed up your campaign progress is to prioritize movement speed boots. Faster movement means faster leveling, so always keep an eye out for them early and often. Pick up any magic boots that drop in the early game, and don’t hesitate to use Orbs of Transmutation or Augmentation to try and roll movement speed on them.
Movement speed tiers unlock gradually as you level:
- Level 1: Tier 6, +10% movement speed
- Level 15: Tier 5, +15% movement speed
- Level 30: Tier 4, +20% movement speed
- Level 50: Tier 3, +25% movement speed
- Level 82+: The highest tiers become available
Throughout the campaign, always aim to upgrade to the next tier of movement speed as soon as it’s accessible. Having the right boots at the right level can make a huge difference in how quickly you progress.
Tip 5: Upgrade Breakpoints
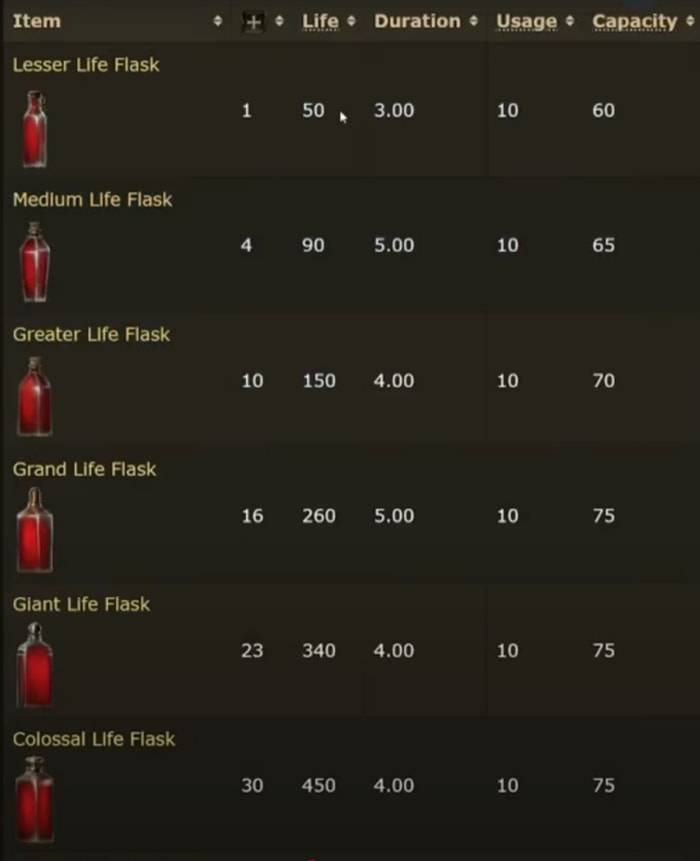
Another crucial factor is paying attention to your upgrade breakpoints—not just for weapons but also for flasks. According to the PoE Wiki, keeping your flasks updated can mean the difference between life and death. Running with an under-leveled flask when a stronger one is available could cause you to die unnecessarily, forcing you to repeat an entire zone. Always update your flasks to maximize survivability.

The same applies to weapons. Using a good weapon base with the right damage can dramatically shorten boss fights. The difference between a 10-second boss kill and a frustrating 10-minute battle (with multiple deaths and retries) often comes down to whether you’ve upgraded your weapon. Staying on top of both flask and weapon upgrades ensures you’re dealing maximum damage while also staying alive, which is essential for efficient campaign progression.
Tip 6: When to Visit Town
Knowing your upgrade breakpoints and when new weapon bases become available also helps you decide the best times to return to town. For example, a Gothic Quarterstaff—a huge damage boost for certain builds—first appears at level 11. If you know this, you can plan to check the vendor as soon as you hit level 11. Finding one (and socketing it with a couple of runes) can be a massive upgrade for your build.
Vendors partially refresh their inventory each time you level up. So, if you check at level 11 and don’t see what you need, you can return at level 12 after salvaging or selling items to try again. Timing your trips back to town around these breakpoints ensures you don’t miss key upgrades while also avoiding unnecessary downtime.
Tip 7: Regex
A very important tool for efficiency is using the built-in search (regex) function in vendor windows. At the bottom of most vendor menus, you’ll find a search box where you can type keywords to highlight modifiers you’re looking for. For example, typing “movement speed” will highlight boots with that modifier. Even typing partial words like “end spd” works.
You can also build regex strings by separating terms with a vertical bar ( | ). For example, typing “movement speed|max life” will highlight items with either modifier. Adding quotation marks at the start and end further refines your search. This way, you don’t need to scan every single item—only the ones with relevant stats.
Common search terms include: life (for maximum life), res (for resistances), and spd (for movement speed). You can save custom regex strings in your social window (accessed with J) and update them as you go. This ensures you’re always catching the items you actually need without wasting time.
Tip 8: What Loot to Pick Up
One of the biggest slowdowns for players is overlooting. You don’t need to pick up everything. Focus on:
- All PoE 2 currency items – always worth it.
- Unidentified magic items – potential upgrades.
- Magic boots early on – they can roll movement speed, which is critical.
- Rare items – possible upgrades or vendor fodder for gold/regal orbs.
- White weapon bases – new bases can be upgraded with Orbs of Transmutation or Alchemy.
- White rings/amulets – for melee builds, even a white iron ring early can provide big damage.
To avoid wasting time, use a loot filter from sites like FilterBlade (e.g., NeverSink’s filters). These highlight valuable drops so you won’t miss them, while ignoring the junk.
Tip 9: Experience Management
Managing your XP is critical for campaign speed. The goal is to stay within 1–2 levels of the zone level.
- If you’re too high (e.g., zone is level 11 but you’re level 15), you’re killing too much.
- Focus on large packs, rare packs, and magic packs for efficiency.
Also, pay attention to level breakpoints for unlocking key upgrades:
- Weapon bases – stronger ones become available at your level.
- Flask types – higher tiers improve survivability.
- Skill gems – certain powerful skills unlock at specific levels (e.g., by Act 1’s end, aim for level 14 to unlock Ice Strike for the Geonor fight).
Planning ahead ensures smoother boss fights and avoids unnecessary grind.
Tip 10: Flasks and Resistances
Dying is the biggest time loss, so prioritize defenses—especially resistances and flasks.
- Act 1: Focus on Cold Resistance.
- Act 2 (early): Fire Resistance.
- Act 2 (later): Lightning Resistance.
- Act 3: Fire and Chaos Resistance.
Use rings and charms to plug resistance gaps (e.g., a Sapphire Ring for cold res). This prevents bosses like Geonor from one-shotting you. Always keep flasks upgraded to match your level for consistent survival.
Tip 11: Ascendancy
Your Ascendancy Labyrinth is one of the most powerful boosts you can get during the campaign. Even if it takes 10–15 minutes, the payoff in offense and defense far outweighs the time spent. Don’t wait until the endgame—complete it during the campaign.
Before attempting it, make sure you’re properly prepared:
- A decent weapon
- Strong defenses
- Updated flasks
Check the PoE Wiki for weapon breakpoints so you can plan the lab around a big upgrade (e.g., securing a Steelpoint Quarterstaff after Act 2 for huge damage).


