This guide, shared by Hector Lecture on his YouTube channel, covers the full AAC Heavyweight M12S (Lindwurm) encounter, focusing on clear role responsibilities, Party Finder–friendly positioning, and step-by-step resolutions for each major mechanic. Let's dive in. As always, if you want a quicker way to clear this tier, MmoGah offers FFXIV Boost service for the AAC Heavyweight Savage tier, which is easy and hassle-free.
Key Takeaways
- The fight opens with The FixerVery heavy-hitting raidwide AoEMandatory heavy mitigationMitigate another Fixer after Grotesquerie: Act 1Intercardinal Platform: Fixer → stack: heavy mitigation is mandatory, and under-mitigating will result in deaths.
- Mortal SlayerLindwurm summons eight hands (four per side)Orbs spawn two at a time, both on one side or one per sideEach orb targets the nearest player to the boss hitbox on that sideRepeats later: exactly the same as the first occurrence always has 2 purple tank-buster orbs (Main Tank first, Off Tank second) and 6 green spread orbs, which the party takes in a conga line: H1/H2, then M1/M2, then R1/R2.
- Grotesquerie: Act 2 is the most complex mechanic: AlphaPaired with a BetaAlpha 3 & 4: soak blob towers firstAlpha 1 & 2: break tether first, then soak towerAfter soaking, stand still: you're done players soak boss-dropped towers and BetaPaired with an AlphaRun opposite exit to break tetherThen run opposite exit again to soak a towerSprint out before the final crush players soak towers from tether breaks, both in the order 3 → 4 → 1 → 2.
- In SlaughtershedSupports slightly north of the hitbox arrow, DPS on or slightly southDragon heads: half-arena cleaves, dodge right → then leftSecond: regrown arms cause knockbacks that alternate sidesFinal: same pattern again, the safe spots are the northern corners: the stack goes to the corner with the blob and spreads to the empty corner. In the second one, roles swap (supports stack, DPS spread).
- Get the boss to 0% before Refreshing Overkill completes to reach the phase transition. If it is not pushed low enough, it becomes untargetable and the party wipes instantly.
General Positioning
This fight primarily uses spread positions. These are role-based, mirrorable, and ordered from north to south. Some mechanics may require minor adjustments to dodge Chrono Cleaves or to preserve melee uptime, but the base spread order remains consistent.
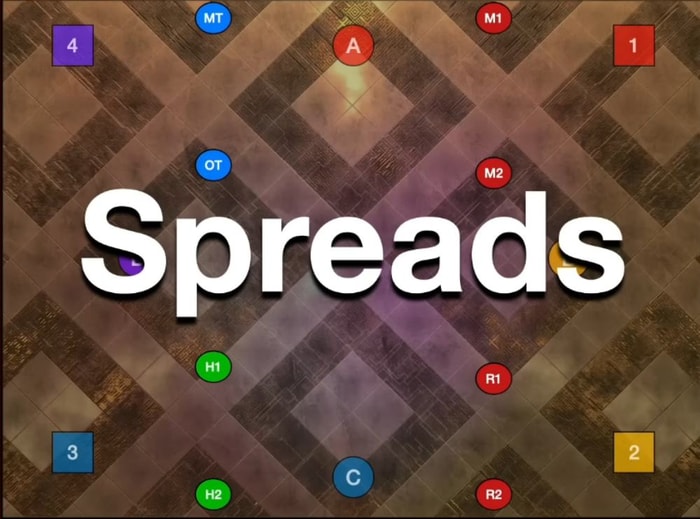
Opening: The Fixer
The fight begins with The Fixer, a very heavy-hitting raidwide AoE.
Mandatory heavy mitigation: under-mitigating will result in deaths.
Mortal Slayer
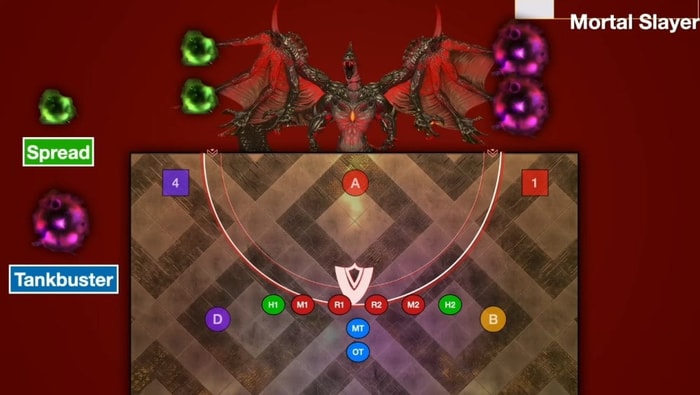
Lindwurm summons eight hands (four per side) and casts Mortal Slayer.
Orb Types
- Green Orbs – Spread AoEs (any role)
- Purple Orbs – Tank busters (tanks only, heavy mitigation required)
Rules
- Always 2 purple + 6 green
- Orbs spawn two at a time
- Can be both on one side or one per side
- The orb targets the nearest player to the boss hitbox on that side
Tank Assignments
- Main Tank → First purple orb
- Off Tank → Second purple orb
Green Orb Order (Conga Line)
- H1 – First green (left)
- H2 – First green (right)
- M1 – Second green (left)
- M2 – Second green (right)
- R1 / R2 – Third & fourth green on the side with four orbs
Execution Tips
- First players stand against the wall
- Second players stay on deck, inside the hitbox, but not on the wall
- Others wait outside the hitbox
- After exploding, players move outward toward the corners
- Next player slides in like a conveyor belt
Edge Case: If a purple and green orb spawn simultaneously, the outer orb goes to the innermost player. Tanks must adjust positioning to avoid mis-targeting.
Post–Mortal Slayer
- Group northwest
- Loose spread
- Prepare for Grotesquerie: Act 1
Grotesquerie: Act 1
Debuffs Overview
- Purple Growth Debuff
- Indicates a directional cleave. Cleave direction rotates with the player facing.
- Stack Debuff
- Always on one role
- Spread Debuffs
- On the opposite role
Puddle Baiting
- Stack tightly
- Bait 4 puddles: First 3 along the north wall, and the 4th swerves inward near the hitbox arrow
During the third puddle, Lindwurm begins Ravenous Reach.
Ravenous Reach Resolution
- Watch the dragon's head direction: Straight down or diagonal
- Dodge to the safe side
- Resolve the stack in the corner
- Turn cleaves outward — mis-aiming will kill teammates
After resolution
- Tanks move away
- Party stacks on one side
- Blobs drop + tank busters + stack
- Tanks run in opposite directions
- Tankbusters can be stacked with sufficient mitigation
Mitigate another Fixer afterward.
Grotesquerie: Act 2 (Most Complex Mechanic)
Debuffs
- Alpha / Beta pairs
- When the timer expires → tether forms
- Break the tether by running opposite
- Break causes:
- Spread AoE
- Magic Vulnerability
- Tower spawning under Beta
Tower Rules
- Alpha players soak boss-dropped towers
- Beta players soak towers from tether breaks
- Order for both: 3 → 4 → 1 → 2
Simplified Role Logic
Alpha Players
- Alpha 3 & 4: soak blob towers first
- Alpha 1 & 2: break tether first, then soak tower
- After soaking, stand still — you're done
Beta Players
- Run opposite exit to break tether
- Then run opposite exit again to soak a tower
- Final step: sprint out before the final crush
Chronological Flow
- Boss drops 4 blobs
- Cruel Coil pulls everyone to the center
- Alpha 3 & 4 soak blobs
- Alpha 1 breaks → Beta 1 runs opposite → Tower → Beta 3 soaks
- Alpha 2 breaks → Beta 2 opposite → Tower → Beta 4 soaks
- Alpha 3 breaks → Tower → Beta 1 soaks
- Alpha 4 breaks → Tower → Beta 2 soaks
- All Betas escape exit
SplattershedModerate raidwide: mitigateBoss arms explode → dragon arms formIntercardinal Platform: heal through it after spreads: Moderate raidwide
- Mitigate
- Boss arms explode → dragon arms form
Grotesquerie: Act 3
Growth Mechanics
- Growth direction is fixed
- Start by pointing growth toward the center
- Move opposite growth to the cardinals
Each cardinal has 1 Support and 1 DPS.
Floor Break Patterns
- Either cardinals or intercardinals are safe
- Identify by checking AoE at the four-way marker
Cardinal Safe
- Stay cardinals
- Spread adjustments to avoid overlap
- Bind → towers fire between partners
Intercardinal Safe
- Everyone rotates in the same direction (clockwise)
- Supports bottom-left, DPS top-right
- Towers fire in a rotation pattern
Correct positioning ensures towers are caught cleanly.
Dragons & Curtain Call
The platform depends on the previous safe pattern.
Cardinal Platform
Dragons Spawn
- Tanks bait busters diagonally north
- Heavy mitigation recommended
Follow-up
- Dragon's fire spreads to the furthest players
- Tanks move middle, melees near the wall
Curtain Call
- Similar to Act 1
- 5 puddles instead of 4
- Purple spreads must be hit by cleave
- Yellow spreads avoid cleave
- Heavy mitigation required
Afterwards
- Alpha tethers break
- Supports left / DPS right
- Dodge blobs
Intercardinal Platform
- Tanks bait busters north corners
- Fixer → stack
- Puddles loop counterclockwise NW
- Identify who must be hit by the cleave
- Spread freely inside the cleave if required
After spreads
- Rush safe zones
- Heal through Splattershed
Mortal Slayer (Repeat): Exactly the same as the first occurrence.
Slaughtershed (Final Mechanics)
Positioning
- Supports slightly north of the hitbox arrow
- DPS on or slightly south
Resolution Rules
- Safe spots: Northern corners
- Stack goes to the corner with blob
- Spreads go to the empty corner
Dragon heads
- Half-arena cleaves
- Dodge right → then left
Second Slaughtershed
- Roles swap (supports stack, DPS spread)
- Regrown arms cause knockbacks
- Knockbacks alternate sides
Tip: Use knockback immunity if available.
Final Slaughtershed
- Same pattern again
- Execute cleanly
Enrage
If the boss is not pushed low enough:
- Becomes untargetable
- Instant party wipe
If the boss reaches 0% before Refreshing Overkill completes:
- Phase transition
- The fight is cleared
Want a quicker way to clear this tier? MmoGah offers an FFXIV Boost service for the AAC Heavyweight Savage tier, which is easy and hassle-free.
Buy FFXIV BoostingFAQ
How much mitigation does The Fixer need in M12S?
The Fixer opens the fight as a very heavy-hitting raidwide AoE, so heavy mitigation is mandatory: under-mitigating will result in deaths. Mitigate another Fixer after Grotesquerie: Act 1.
How do the Mortal Slayer orbs work in M12S?
Lindwurm summons eight hands (four per side), and there are always 2 purple orbs (tank busters: tanks only, heavy mitigation required) and 6 green orbs (spread AoEs, any role). They spawn two at a time, and each orb targets the nearest player to the boss hitbox on that side. The Main Tank takes the first purple orb and the Off Tank the second, while H1 and H2 take the first green on the left and right, M1 and M2 the second, and R1 / R2 the third and fourth green on the side with four orbs.
How do you resolve Grotesquerie: Act 2 in M12S?
Alpha players soak boss-dropped towers and Beta players soak towers from tether breaks, both in the order 3 → 4 → 1 → 2. Alpha 3 & 4 soak the blob towers first, while Alpha 1 & 2 break their tether first, then soak a tower. Beta players run to the opposite exit to break the tether, run to the opposite exit again to soak a tower, and sprint out before the final crush.
How do you know whether cardinals or intercardinals are safe in Grotesquerie: Act 3?
Check the AoE at the four-way marker: either the cardinals or the intercardinals are safe. On cardinal safe, stay on the cardinals; on intercardinal safe, everyone rotates clockwise, with supports bottom-left and DPS top-right. The platform for Dragons & Curtain Call depends on this safe pattern.
How does Slaughtershed work in M12S?
Supports stand slightly north of the hitbox arrow and DPS on or slightly south, and the safe spots are the northern corners: the stack goes to the corner with the blob, spreads to the empty corner. In the second Slaughtershed, roles swap (supports stack, DPS spread) and regrown arms cause knockbacks that alternate sides, so use knockback immunity if available. The final Slaughtershed is the same pattern again.
What happens at the enrage in M12S phase 1?
If the boss is not pushed low enough, it becomes untargetable and the party wipes instantly. If it reaches 0% before Refreshing Overkill completes, the fight moves to the phase transition.