Do you want to play group content alone with your Magicka Dragonknight? If so, then you are in the right place. In this guide, Dying Legacy shows you a Magicka Dragonknight with high damage output and survivability. With a strong mix of single-target and AoE skills, you can solo any content in The Elder Scrolls Online.
Attributes: 64 points to Magicka
Race: Breton (for more sustain)/Khajiit (for extra Critical Damage)/High Elf (for extra Spell Damage)
Mundus
Choose The Lover to gain extra Spell and Physical Penetration for solo content
Choose The Thief to gain extra Critical rating when doing content as a part of a group
Food: Clockwork Citrus Filet
Clockwork Citrus Filet will increase your Max Health, Health Recovery, Max Magicka, and Magicka Recovery. You can buy Clockwork Citrus Filet at ESO' Guild Vendor with gold. You can also make it by yourself at the Cooking station as long as you have the recipe.
Since Clockwork Citrus Filet can be expensive, you can choose the Witchmother's Potent Brew. It gives lower stats than the Clockwork Citrus Filet and doesn't give Health Recovery, but the difference is very tiny.
Potion: Essence of Spell Power
Essence of Spell Power restores your Magicka immediately and grants Major Sorcery, Major Prophecy, and Major Intellect, making it helpful for longer and more challenging fights. You can grab Essence of Spell Power at the Guild Vendor or make it yourself at the Alchemy Station.
You can also use Essence of Magicka instead. This potion gives you Major Intellect and restores Magicka immediately. It may not be as useful as Essence of Spell Power, but you can get it easily from almost every enemy in the game.
Gear Setup
|
Piece |
Set |
Type |
Trait |
Enchantment |
|
Head |
Iceheart/Pillar of Nirn |
Light/Medium |
Divines |
Max Magicka |
|
Shoulder |
Iceheart/Pillar of Nirn |
Light/Medium |
Divines |
Max Magicka |
|
Chest |
Whorl of the Depths
|
Light |
Divines |
Max Magicka |
|
Waist |
Whorl of the Depths
|
Light |
Divines |
Max Magicka |
|
Hands |
Whorl of the Depths
|
Light |
Divines |
Max Magicka |
|
Legs |
Whorl of the Depths
|
Light |
Divines |
Max Magicka |
|
Feet |
Whorl of the Depths
|
Light |
Divines |
Max Magicka |
|
Necklace |
Pillar of Nirn |
Jewel |
Bloodthirsty |
Weapon Damage |
|
Ring |
Pillar of Nirn |
Jewel |
Bloodthirsty |
Weapon Damage |
|
Ring |
Ring of the Pale Order |
Jewel |
Bloodthirsty |
Weapon Damage |
|
Main-Hand Weapon |
Pillar of Nirn |
Dagger |
Nirnhoned |
Flame Damage |
|
Off-Hand Weapon |
Pillar of Nirn |
Dagger |
Charged |
Poison |
|
Back-Bar Weapon |
Crushing Wall |
Inferno Staff |
Infused |
Weapon Damage |
Whorl of the Depths is a Trial set that you can get from the Dreadsail Reef, and on veteran difficulty, you can get a perfected version, which adds extra Critical Chance.

Whorl of the Depths, Pillar of Nirn, and Crushing Wall
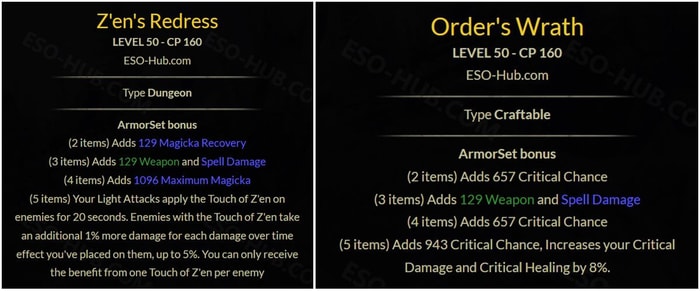
If you haven't stepped into the Trial or want to use something else, you can use Z'en's Redress set found in the Lair of Maarselok. You can also use Order's Wrath, a crafted set from the High Isle Chapter of ESO. It is also obtainable at the Guild Vendor.

Z'en's Redress and Order's Wrath
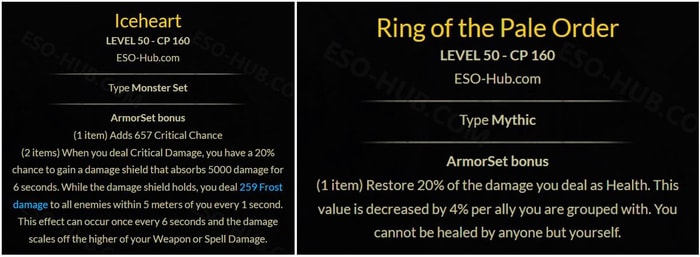
You can also use the Ring of the Pale Order on the ring slot, which is from the Antiquities System. The item will take up a ring slot, so you will need to wear your jewelry set on either the Shoulder or Helm slot. By doing this, you will lose the two-piece bonus of your Monster set, but the Ring of the Pale Order will make up for it with Healing.

Incheart and Ring of the Pale Order
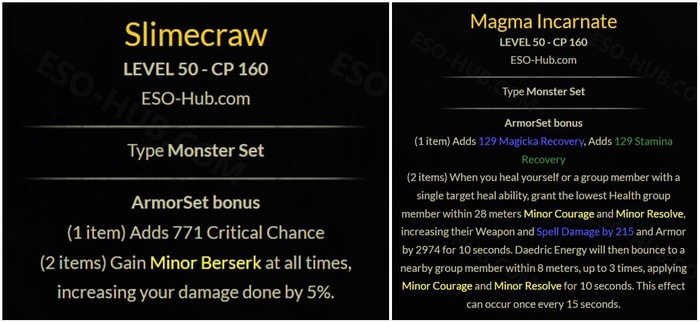
An alternative to the Iceheart is the one-piece Slimecraw, which gives extra Critical Chance. Another alternative is the Magma Incarnate. Its one-piece bonus gives you Magicka and Stamina Recovery.

Slimecraw and Magma Incarnate
Skill Setup
Front Bar
Burning Embers deals Flame Damage instantly and adds a DoT effect that lasts for 24 seconds. You will also heal for 102% of the damage done with this skill. Enemies hit by the initial hit are afflicted with the Burning status effect.
Engulfing Flames deals Flame Damage to enemies in front of you, causing them to burn for 24 seconds, and the affected enemies will take more damage from flame attacks.
Barbed Trap deals Bleed Damage, causes the enemy to bleed for 20 seconds, and grants you Minor Force. The damage has a higher chance of causing the Hemorrhaging status effect. Enemies who trigger the Trap can be immobilized for 2 seconds.
Flame Lash deals Flame Damage. If the enemy is immobilized or stunned, you'll knock them off-balance. Targeting an off-balance enemy will change this skill into Power Lash, causing the skill to cost half the Magicka and deal extra damage and Healing.
Volatile Armor will spray spikes around you, causing enemies to take Flame Damage over 20 seconds. It also gives Major Resolve. When enemies attack you from Melee Range, you will return some of the damage back to the enemy.
Flawless Dawnbreaker (Ultimate) deals Physical Damage to enemies in front of you and additional damage over 6 seconds. After activating the skill, you will increase your Weapon and Spell Damage by 300 for 20 seconds.
Back Bar
Unstable Wall of Fire creates a line of fire in front of you for 10 seconds, dealing Flame damage to enemies standing in it. When the skill ends, the wall of fire explodes, dealing more Flame Damage. If you're using the Maelstrom staff, this effect will be stronger.
Scalding Rune puts a rune on the ground that takes two seconds to arm and lasts for 24 seconds. When triggered, it deals Fire Damage to all enemies in the target area, dealing additional Flame Damage over 26 seconds.
Harness Magicka requires you to wear five Light armor pieces to use it. The skill will convert some of your Magicka into a shield that absorbs damage and restores your Magicka.
Degeneration adds damage over time effect to your target that deals Magic damage over 24 seconds. It also grants you Major Brutality and Sorcery for 24 seconds.
Cauterize will cause you to fire Fireballs at yourself or an ally for over 15 seconds, causing you to heal. While slotted, it will grant you Major Prophecy and Savagery.
Standard of Might (Ultimate) will place a flag in front of you and deal flame damage for 20 seconds to any enemy standing in it. It will also apply Major Defile. If you are an ally standing near the flag, you'll take 15% less damage and also deal 15% more damage. An ally near the standard can also activate the Shackle synergy, dealing flame damage to enemies and immobilizing them for 5 seconds.
Passive Skills
Ardent Flame Skill-Line: Combustion, Warmth, Searing Heat, and World in Ruin
Draconic Power Skill-Line: Iron Skin, Burning Heart, Elder Dragon, and Scaled Armor
Earthen Heart Skill-Line: Battle Roar and Helping Hands
Dual Wield Skill-Line: Slaughter, Dual Wield Expert, Controlled Fury, Ruffian, and Twin Blade and Blunt
Destruction Staff Skill-Line: Tri Focus, Penetrating Magic, Elemental Force, Ancient Knowledge, and Destruction Expert
Light Armor Skill-Line: Light Armor Bonuses, Light Armor Penalties, Grace, Evocation, Spell Warding, Prodigy, and Concentration
Medium Armor Skill-Line: Medium Armor Bonuses, Dexterity, Wind Walker, Improved Sneak, Agility, and Athletics
Fighters Guild Skill-Line: Intimidating Presence, Slayer, Banish the Wicked, and Skilled Tracker
Undaunted Skill-Line: Undaunted Command and Undaunted Mettle
Assault Skill-Line: Continuous Attack (Optional). You only need to put one skill point into it to gain the Major Gallop. You can also put 2 points into this skill for PvP content or activities in Cyrodiil.
Racial: You'll want to grab everything in the skill line of your Race.
Alchemy Skill-Line: Medicinal Use (Optional). It is highly recommended to grab the Medicinal Use skill because it causes your potions to last much longer.
Champion Points
Warfare
Wrathful Strikes (Slot) increases Weapon and Spell Damage.
Fighting Finesse (Slot) increases Critical Damage and Critical Healing.
Deadly Aim (Slot) increases damage done with single target attacks.
Thaumaturge (Slot) increases damage done with damage over time effects.
Fitness
Boundless Vitality (Slot) grants Health.
Fortfied (Slot) increases Armor.
Rejuvenation (Slot) increases overall sustain.
Siphoning Spells (Slot) restores Magicka when you kill enemies.
Crafting
It doesn't matter which you take in the Crafting tree. Everything is personal preference or content specific. But it is recommended to take the following stars:
Treasure Hunter (Slot): When doing solo play, you can take the Treasure Hunter to increase the quality of items you find in treasure chests.
Rationer (Slot): It increases the duration of food.
Liquid Efficiency (Slot): The star gives you a slight chance of using a potion or poison without consuming it.
Steed's Blessing (Slot): Taking this star increases your out of combat Movement Speed, which can be helpful for solo.
That is the build for a solo Magicka Dragonknight. Please subscribe and follow Dying Legacy on Twitch if you find this build helpful.


