Welcome to Rider's meta subclassing PvP build for The Elder Scrolls Online. This setup is not only versatile but also effective across all classes, making it a standout choice for players looking to dominate in Cyrodiil, Battlegrounds, or the Imperial City. Whether you're a seasoned veteran or a newcomer to ESO's PvP scene, this guide will help you craft a powerful build tailored to your playstyle.
Strengths & Weaknesses
Strengths
Strong Burst Damage: The build allows for quick eliminations with a simple combination.
Efficient Combo Building: With a cheap ultimate, you can deal high damage with minimal downtime between burst windows.
Good Sustain: The sustain is above average, mainly because you can keep pressure on opponents without frequently switching bars, reducing resource drain.
High Mitigations: The mitigations in this build are notably high, definitely above average. This is especially true when you consider the block cost mitigation gained from various unique resources, allowing the stamina to regenerate even while blocking. This feature enables you to maintain longer periods without needing to break line of sight in situations where you are outnumbered.
Decent Speed: With Major Expedition incorporated, the speed is decent. But if you opt for Storm Calling, you can also utilize Streak, which is arguably the best mobility skill in ESO. The effectiveness of your mobility will vary based on whether you choose Streak, Vault, or any other mobility skill, and it ultimately depends on your personal play style.
Good Class Versatility: One of the standout features of this build is its versatility. You can adjust it to suit your preferred playstyle. If you prefer a tankier approach, you might consider selecting Soldier of Apocrypha or Winter's Embrace. On the other hand, if mobility is more your style, you can opt for Storm Calling instead.
Weaknesses
Resource Drain Under Pressure: If caught out during intense situations, resource management can become challenging. However, you can easily adjust glyphs or other elements of the build to improve sustainability.
Skill Setup
For abilities, focus on maximizing critical damage. For this build, Animal Companions (Warden) and Assassination (Nightblade) are the damage skill lines, and Restoring Light (Templar, base class) serves as the defensive skill line. While it is recommended to use the Storm Calling skill line for increased physical damage and amplitude passives, you can use your class's defensive line if you prefer.
Both Animal Companions and Assassination offer substantial critical damage, with Assassination also boosting crit chance. With the Hemorrhage passive activated, you would achieve around 50% crit chance and 54% crit damage in combat.
Front Bar Skills
Surprise Attack, Merciless Resolve, Deep Fissure, Ulfsild's Contingency, Deceptive Predator, and Incapacitating Strike (Ultimate).
The front bar contains a spammable skill, three burst skills, and Deceptive Predator for mobility and passive critical damage. The Ultimate skill is Incapacitating Strike, which is essential for this setup. While Onslaught (Ultimate) could be a viable alternative, the build already has plenty of natural penetration, which diminishes its effectiveness.
Back Bar Skills
Healing Soul, Vigor, Bull Netch, Restoring Focus, Extended Ritual, and Temporal Guard (Ultimate).
Although Storm Calling is recommended, other choices are viable as long as you have Major Resolve, a burst heal, Vigor, and two defensive skills.
Temporal Guard is used for gaining Minor Protection. However, if you're equipped with a sword and shield, opt for Spell Wall (Ultimate) instead.
Gear Sets
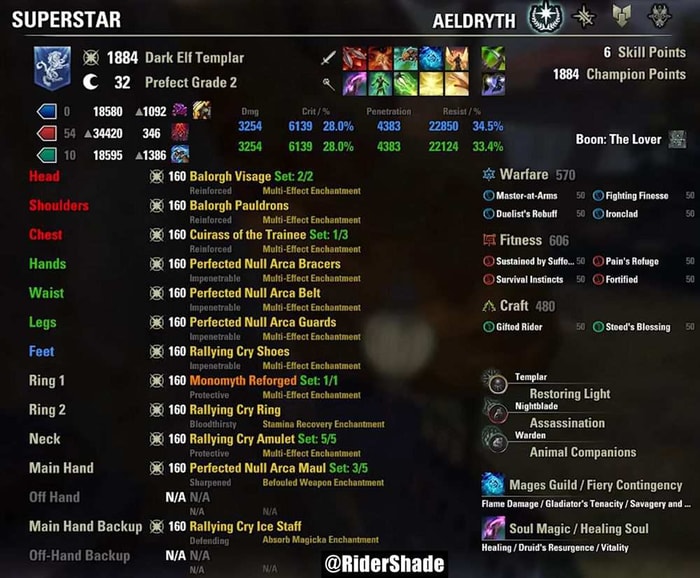
Slivers of the Null Arca
The build uses Perfected Null Arca maul as the front bar weapon, but the normal version works too.
Null Arca is currently very strong, providing significant burst potential. Since this is a build that focuses on critical damage, the critical chance from this set aligns perfectly with the goals of the build.
This set hits targets significantly hard—slightly lower than Incapacitating Strike and a bit higher than the Surprise Attack. While the difference may seem small, the power of this setup in securing kills is substantial.
Additionally, the set requires critical strikes to activate, and the spammable ability activates Sundered, providing additional proc chances. Furthermore, your light attacks inflict Diseased, enhancing this effect. Essentially, you'll achieve maximum stacks quickly, especially if your build includes a DoT effect, like the one from the Contingency Script, although this may lead to inconsistent activations.
Rallying Cry
Rallying Cry is a staple defensive set that not only boosts survivability but also increases weapon and spell damage. If you prefer not to use Rallying Cry or if someone in your group is already using it, there are plenty of alternatives you can consider.
Balorgh vs. Bloodspawn
Bloodspawn enhances ultimate frequency, while Balorgh boosts potency. However, in scenarios like Imperial City, where ultimate generation is rapid, or in duels against strong opponents, use Balorgh.
It's wise to carry both options and choose based on your situation. The added resistances from Bloodspawn are beneficial, but they are not critical to the build. Balorgh is definitely stronger if you prefer tighter burst windows; experienced players often opt for tighter yet more potent bursts. Ultimately, selecting the right monster set should align with your play style, and Zoal the Ever-Wakeful could be a great alternative if that suits you.
Monomyth Reforged
For a critical damage build, Monomyth Reforged is an obvious choice, offering an additional 20% critical damage and Major Protection on the back bar.
Armor of the Trainee
In TESO, the Armor of the Trainee is a highly versatile set you can buy with gold. It's widely used across different builds and stages of the game due to its simplicity, flexibility, and strong one-piece bonus.
While Impenetrable is often regarded as the strongest trait in the meta, this build uses a Reinforced Armor of Trainee to maximize the heavy armor slots. This choice provides versatility against off-meta setups that rely on either raw damage or DOTs.
Traits
Use the Sharpened trait on the Maul. For the back bar, use the Defending trait to enhance defenses. This choice synergizes well with the ice staff's passives, as outlined in the Destruction Staff skill tree.
The two pieces of Bloodspawn/Balorgh have the Reinforced trait, while other pieces are composed of the Impenetrable traits. This combination allows for armor value maximization, and the Reinforced trait is the most effective option for achieving that. Since the other pieces are medium and light armor, they wouldn't benefit as much from Reinforced. Therefore, using Impenetrable for those pieces makes the most sense, as it provides a static value.
All the glyphs are Prismatic, but if you're on a budget, consider using Health glyphs on your larger pieces and Stamina Glyphs on the smaller ones.
Many of the traits can be swapped out based on your play style. If you prefer Swift, feel free to use that. Conversely, if you want stronger burst damage, Infused is an excellent choice. Ultimately, it's about what you want from your build, so be sure to adapt these recommendations rather than simply copying them.
Mundus, Food, and Champion Points
Mundus Stone: The Lover
The Thief provides more healing, while the Shadow offers lower average damage but higher bursts that can be less reliable. The Lover is ideal for applying sustained pressure to a target. If you want a more defensive approach, you could opt for the Thief, but don't use The Lady.
If you pull back too much on offense to focus on defense, securing kills becomes more challenging, which means you'll be spending more time on the back bar. However, the build is not designed for prolonged back bar camping; it can work for short periods, but it thrives on aggression. To strengthen the build universally, enhance the damage with the Lover.
Food Option
You can choose tri-stat food, such as Bewitched Sugar Skulls, to boost all your sustain, or go for a health-focused option with recovery benefits. You can also use Jewel of Misrule for its stat recoveries and maximum hit points.
Attributes: 54 into Health and 10 into Stamina
You can split points between health and stamina, or focus entirely on health with a bit of stamina. The more comfortable you are with the build, the more points you can invest in stamina. However, if you're new to PvP, starting with a higher health pool is advisable.
Champion Points
Warfare
Master-at-Arms (slot)
Fighting Finesse (slot)
Duelist's Rebuff (slot)
Ironclad (slot)
Fitness
Sustained by Suffering (slot)
Pain's Refuge (slot)
Survival Instincts (slot)
Fortified (slot)
Craft
Gifted Rider (slot)
Steed's Blessing (slot)
The Warfare tree Champion Points (blue tree) primarily focuses on offense. If you're less comfortable, consider using Focus Mending or other defensive CPs. Given the current high damage in the game, you can certainly allocate more points to defense if you prefer.
Exploiter is a strong alternative to one of your offensive choices, as it can easily proc off-balance.
Rotation
The rotation is straightforward. Start by spamming Surprise Attack a few times to bring your opponent's health down to a more ideal burst range. If your opponent continues to block or remains on their back bar to mitigate your burst damage, don't push further into the rotation—just keep spamming until they decide to swap bars. Once they attempt to go offensive, move to the next step.
The second step is to activate Deep Fissure to apply Major Breach and deal delayed damage. After that, use Ulfsild's Contingency to enhance the delayed damage, and finish the burst combo with Incapacitating Strike when you have 120 ultimate or more. In most cases, this will nearly eliminate your enemies, especially in non-CP environments like Battlegrounds. While you can use Incapacitating Strike without 120 ultimate, it is recommended to save it for a stronger burst window.
It's important to note that Deep Fissure hits harder on the second activation. Against tougher opponents, you'll want to time your burst off of the second Deep Fissure activation rather than the first. However, the first activation is usually sufficient to secure a kill. If your target is still alive, that's when you should throw your Merciless Resolve. If your opponent anticipates this, wait a moment for them to dodge before casting it.
During your burst, Null Arca will activate, dealing another substantial chunk of damage. That's essentially it for the offensive rotation: Deep Fissure, Ulfsild's Contingency, Incapacitating Strike, and Merciless Resolve. If they're still alive, you reset the combo.
Defensive Strategy
For defense, prioritize maintaining Bull Netch and Restoring Focus. If you're taking significant damage, the build offers unique resource recovery, allowing you to restore stamina even while blocking. Utilize your runes and ritual circles for added protection.
Whenever you need to play defensively, block or roll dodge to break line of sight first. However, against a single opponent, you can effectively avoid dying as long as you block and activate your heals. The sustain from this setup is strong, allowing you to remain in your runes and block while you recover.
Final Thoughts
This meta PvP build is designed for adaptability, allowing you to tailor it to your preferred playstyle—whether that's tanky survivability or high-speed mobility. With strong burst damage, excellent sustain, and robust mitigation, it thrives in both solo skirmishes and group engagements.
Remember, the key to mastering this build lies in understanding its strengths and weaknesses while adapting it to your needs. Experiment with gear sets, traits, and Champion Points until you find the perfect balance that suits your playstyle.
So gear up, adventurers! Tamriel awaits your dominance in PvP combat.
YOU MAY ALSO LIKE:
ESO Builds: Templar Subclass for PvP – Update 46