Dear exiles, Esoro has made a terrific YouTube about Mjölner Inquisitor build for Path of Exile days ago. This video shows you how to wield the power of Mjölner to shred through enemies unleashing automatically triggered lightning destruction. Now the professional PoE Shop will summarize it with text, and let's begin.

Build Basics
Core Skills
The channeling skills Cyclone will be used as the catalyst for both cast on grit and Mjölner because it attacks at an extremely fast and consistent rate while maintaining fantastic mobility. When we hit enemies with Cyclone while wielding Mjölner, it will trigger the socketed Arc which will chain from enemy to enemy, providing the bulk of our clear speed, reliable shocks, and significant extra damage against bosses. When we hit and successfully crit with Cyclone, it will automatically trigger the Cast on Crit setup in our body armor, rocking Ball Lightning, a slow-moving projectile that passes through enemies damaging nearby targets with lightning bolts multiple times per second.
Cooldown Basics:
1. Both CoC & Mjölner have independent cooldowns of 0.15 seconds.
- Plus an additional server tick before they can be triggered again.
2. Meaning each can be triggered at most once every 0.165 seconds.
- Without investment into increased Cooldown Recovery Rate.
3. Resulting in around 6 maximum triggers per second, 6.06 to be exact.
Requirements for Maximizing Triggers (Achieving Optimal DPS):
1. Cyclone must be Hitting 100% of the time.
- Accumulate accuracy rating from gear and gems.
- Most of which is granted by Precision and Shaper's Touch.
2. Each Cyclone hit must be a Critical Strike.
- Achieve 100% Effective Crit Chance or very close to it.
- We utilize a lot of sources, the strongest being Righteous Providence.
3. Cyclone must be Attacking just below 6.06 times per second.
- This causes hits to occur just after the cooldowns end, maximizing procs.
- Going over 6.06 APS will cause hits to occur during the cooldowns.
- Resulting in significantly reduced DPS.
Ascendancy
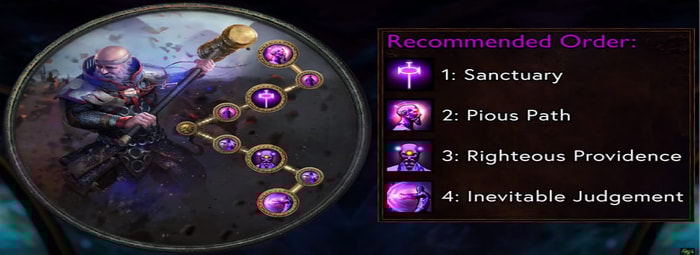
Righteous Providence now provides both 50 strength and intelligence. Alongside 1% increased critical strike chance for each point of whichever attribute is lowest. This incentivizes maximizing and balancing both attributes. When optimized, this is as strong as it sounds. Granting the build-up to 500% increased the critical strike chance. Single-handedly making cast on crit a viable option for the inquisitor.
Inevitable Judgment capitalizes on this perfectly, causing our critical strikes to ignore enemies' elemental resistances. For most elementally focused builds, bosses resist a lot of their damage. Something that has to be heavily worked around, but we'll be hitting critical strikes nearly 100 of the time, which means that thanks to this one ascendancy node. We can ignore all of that nonsense. We are allowing the build to perform about as well against cyrus as it does against a common enemy.
Sanctuary creates consecrated ground anytime we stop moving. This includes channeling Cyclone at a standstill. In the brief pause that occurs during movement skills. Consecrated ground grants significant life regen and increased critical strike chance against enemies standing on it. Sanctuary also causes enemies affected by consecrated ground to take 15% increased damage, a powerful form of more multiplier.
Pious Path causes consecrated ground to regenerate energy shield as well as life. And it also grants full elemental ailment immunity an incredibly strong and convenient defensive layer. Pious Path also makes these beneficial effects truly reliable by allowing them to persist on both us and enemies for four seconds after leaving the consecrated ground.
Jewels
Rare jewels are incredibly important. They provide a serious amount of the build's damage and shore up anything you need a bit more of. Relevant critical strike multiplier is a top priority, but the fantastic value can be found at every budget level. Swap around modifiers until you find jewels you can comfortably afford.
One of your first major upgrades should be a large radius Thread of Hope which provides easy access to a variety of strong distant notables.
A Watcher's Eye should be another high priority as it offers a ton of flexible power. It should feature one or possibly two of these aura-based modifiers. Prices will vary dramatically based upon the chosen modifiers.
From this point onward, cluster jewels become crucial. The large lightning damage cluster jewels provide some DPS and two jewel sockets. They should feature a combination of these notables. The top can be left unallocated for efficient pathing or picked up if you've got a good notable there.
Snowstorm is the strongest by far but requires consistently chilling enemies. If you go the snowstorm route, you'll need to run one medium ailment effect cluster jewel that features either the chilling presence of cold conduction alongside another solid notable. If you are consistently cursing enemies, a lot of power can be gained from running one medium curse effect cluster jewel that features two of these notables.
Fill in the remaining sockets with medium, critical strike chance cluster jewels featuring two of the listed notables as powerful as the clusters themselves are the jewel sockets at the end. I recommend socketing a solid rear jewel into each of them as this provides a monstrous damage boost. Alternatively, Small Cluster Jewels featuring the knot's notable energy grant a staggering amount of maximum energy shield at the cost of damage.
Basic Strategy
General Gameplay Tips:
1. Run Flesh & Stone in Sand Stance, even during boss fights.
2. Maintain consistent Flask uptime, especially your Diamond Flask.
3. Stay active. Always be on the move.
- Cyclone's mobility mitigates a lot of damage.
- Avoid doubling back too quickly.
- A lazy exile is a dead exile.
4. Actively use your Vaal Skills.
Bossing Tips:
1. Before the boss becomes active or as the fight begins, place a frost shield if you're using it.
2. Proc Buffs & Consecrated Ground early
3. Pop Flasks & Vaal RF as the fight begins
4. Constantly hit the boss
- Circle around them to avoid damage
5. Position Boss at the edge of Cyclone's Radius. This allows Ball Lightning to get in extra hits.
6. Disengage if necessary
- Use Vaal Discipline for quick recovery
- Pop Flasks for additional bursts of damage
For exceptionally long fights like cyrus, swap out your quicksilver flask. For another diamond flask, with one of these harvest enchantments.
Leveling Tips
You can view the following video from 12:23 to 13:07 to learn Leveling Trees, Leveling Gear, Leveling Gems, Bandits and Pantheons.
Leveling Gems
Here is a full progression of leveling gem setups that can be modified as you see fed. Converting to cast on crit, happens when you want it to while possible at level 38. I recommend waiting until most of our core and game gear can be equipped. As you approach mapping, I recommend converting to low-life as soon as you have the required items. If you aren't ready and need to farm additional currency, you can start running early content while still life-based.
2. Bandits
When selecting a bandit, I recommend initially siding with Alira. The crit multi is strong, and the resistances make gearing up smoother. Once you've comfortably overcapped your resistances, consider switching to the two passives with a book of reform.
3. Pantheons
For our major pantheon, we are constantly surrounded by enemies making it easy to maximize the many benefits Lunaris provides, and for our minor pantheon, I recommend either Gruthkul or Ralakesh.
Skill Gems
Support Gem Setups
1. Six Links
Cast on Crit socketed into Shavronne's Wrappings. The core of the setup is composed of Cyclone, Cast on Crit, and Ball Lightning. Prioritize getting a level 21 ball lightning as each level significantly improves damage output. Slower Projectiles is the most important support gem, it grants more projectile damage and beneficially slows ball lighting down. The more time it spends near an enemy, the more times it can strike that enemy before moving out of range. The final two sockets will evolve as you optimize the build, early on running Increased Critical Strikes to make capping out your crit chance with cyclone and ball lightning far easier. Alongside it, running Elemental Focus for maximum damage or Inspiration for solid damage and some crit chance.
Once you've got enough crit chance from other sources, drop increased critical strikes and run both elemental focus and Inspiration.
Before eventually dropping Inspiration for level 5 awakened added lightning damage, which at this level not only grants a massive amount of flat lightning damage but also increases the level of ball lightning by 1. Finally, for those min-maxing, consider an awakened elemental focus for more damage. A Divergent Cyclone for more movement speed. A 2120 standard or divergent ball lightning and if you can comfortably accumulate the needed attack speed in awakened cast on grid.
2. Three Links
Socketed into Mjölner. Prioritize getting a level 21 Arc as this improves damage and grants an additional chain. We're not running Elemental Focus here, so Arc can inflict powerful shocks. Initially support Arc with added Lightning damage and Controlled Destruction. Controlled destruction doesn't remove arcs chance to crit. It just lowers it a bit. Eventually, replace Added Lightning Damage with its Awakened version, preferably at level 5 though any level will be an improvement.
Next are Blood Auras—Socketed into Prism Guardian. Wrath simply provides a significant damage boost. Zealotry grants a smaller damage boost, some spell critical strike chance, and the ability to create consecrated ground upon hitting a rare or unique enemy. Discipline supplies a ton of flat energy shield and increases our recharge rate. Vaal Discipline is its activatable counterpart, essentially a panic button that allows our energy shield to recharge constantly for a short time without being interrupted by incoming damage.
Next are Mana-based Auras. Note that while Aspect of the Spider does reserve mana. It is granted by a modifier on a rear gear rather than a skill gem. The Aspect of the spider inflicts a Spider Web onto nearby enemies every second. This hinders them from reducing their movement speed. Up to three webs can affect an enemy at once. Each web increases the damage they take by 5%—a form of more multiplier and significant damage increase. Precision is very important. It grants a much-needed accuracy rating. Alongside some crit chance, run it at level 21 if possible. Flesh and Stone is a dual-mode aura that will always be running in its defensive sand mode in which it lowers damage taken from far away enemies and blinds everything nearby—dramatically improving our chance to evade against affected enemies. Vitality provides significant life regen that will be converting into energy shield regen. Level it as high as possible while leaving enough mana free for your active skills. Finally, Herald of Thunder slightly increases damage output and enables optional gear choices.
3. Four Links
I recommend running Dash or Flame Dash. Link it to Arcane Surge and Second Wind. Arcane surge is a buff that triggers when you spend mana on supported skills. Leave it at a low enough level that it will be triggered by a single dash or flame dash. Second wind grants an additional maximum use and faster cooldown recovery speed. Consider its Anomalous version, which provides two additional maximum uses. The final socket here is Flexible. Consider Frost Shield a fantastic area control spell that mitigates some damage during boss fights, or potentially Vaal Grace for a strong burst of dodge chance when needed, or manually run Assassin's Mark here before you get it on a ring.
4. Two Links & Two Unlinks
The 2L contains Cast When Damage Taken, which will trigger Immortal Call when its damage threshold is reached. For a short time, this will lower the elemental and physical damage we take. Leave Cast When Damage Taken at a low level, so it triggers often. Ensure that immortal call level requirement is equal to or less than that of the cast when damage is taken itself, or it won't be triggered. Alternatively, a max level caster damage taken, linked to a max level Steelskin is a solid alternative. Vaal Righteous Fire is a manually activated Vaal skill. When used, it consumes a portion of our energy shield and grants a massive 29 more spell damage for a short time. Blood Rage is above that once activated is refreshed every time we get a kill, it slightly drains our energy shield in return, granting attack speed and consistent frenzy charges on kill. Shoring up a ton of the attack speed we require, leveling it increases the amount of attack speed it grants, meaning it can be tuned to help you achieve the perfect attack rate. While blood rage itself is consistent, if there's nothing to kill, the frenzy charges won't be. If you want to complete attack rate consistency, blood rage may not be for you. Instead, expand the cast when damage is taken setup with Increased Duration.
Gear Choices
It's finally time to cover the end-game gear. Be sure to use the beastcrafted recipe venomous first of the night on one of your rear items to craft a suffix that grants level 20 Aspect of the Spider.
Mjölner
Let's begin with the moderately priced weapon Mjölner, which triggers a lightning spell on melee hit, with 100 increased spell damage and grants arc an additional chain. It has ridiculously high attribute requirements, which, while cumbersome, mesh perfectly with righteous providence. Mjölner's rules are irrelevant to us, meaning various corruptions are the best way to optimize them. If affordable, try to secure one of these.
Shield – Prism Guardian
Helmet – Crown of the Inward Eye
Body Armour – Shavronne's Wrappings
Gloves – Shaper's Touch
Boots – Algor Mortis / Sin Trek
Amulet – Presence of Chayula
Belt – Bated Breath
Flask
–Quicksilver Flask
–Diamond flask
–Rumi's Concoction
–Atziri's Promise
–Dying Sun
–Silver Flask
–Sulphur Flask
With that, I've covered just about everything. I hope you will enjoy the guide. You can come to MmoGah to see more PoE Builds, and you can buy Cheap PoE Currency and PoE Items here.