Patch 7.5 introduces a brand-new Extreme Trial in Final Fantasy XIV: The Unmaking Extreme. This encounter combines heavy movement, positioning checks, tether mechanics, add management, and coordinated group play throughout two intense phases. Luckily, Hector shared a guide on his YouTube channel, breaking down every major mechanic in order while preserving the important details needed to clear the fight consistently. But if you want a quicker way, MmoGah offers Extreme Trial Final Fantasy XIV boost service, which is convenient.
Preparation and Party Setup
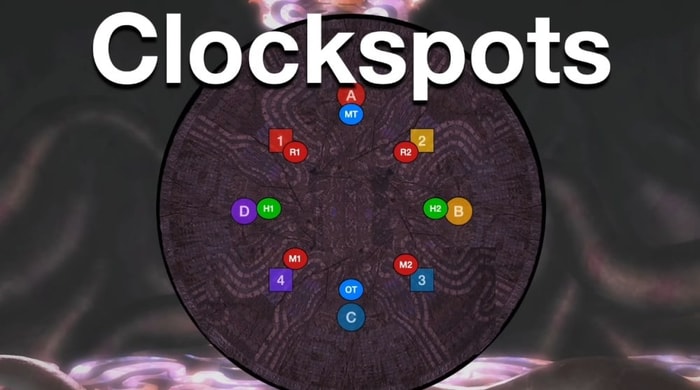
Before pulling the boss, the party should establish several positioning assignments:
Clock Spots: Standard clock spots work perfectly fine.
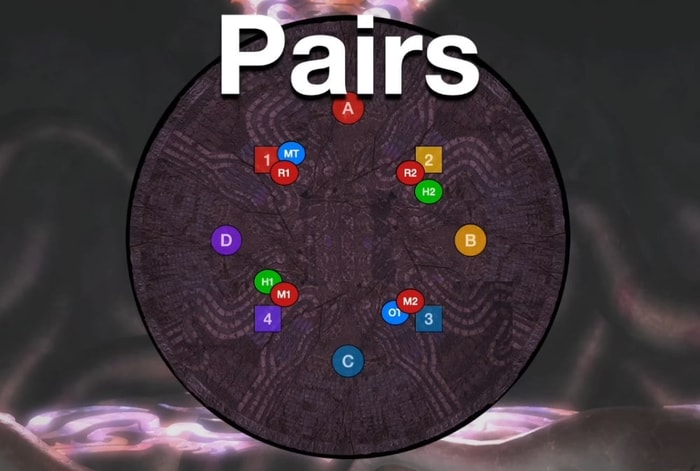
Pair Positions: Supports rotate counterclockwise onto intercardinals.
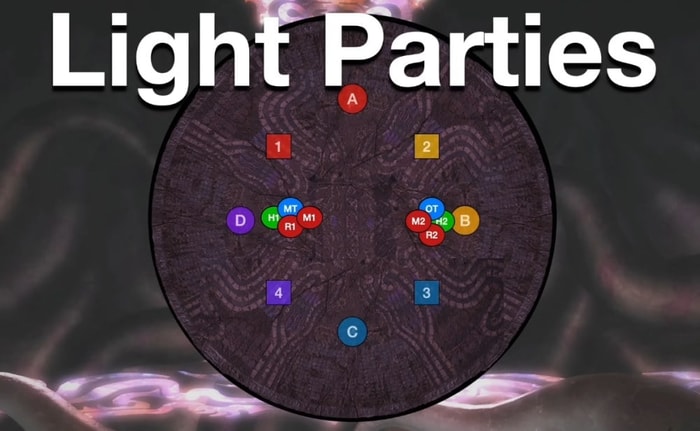
Light Parties
- Group 1: West
- Group 2: East
For relative mechanics:
- Group 1 goes left
- Group 2 goes right
Many groups also place markers on healers as a backup reference point. If players get lost during mechanics, they can simply regroup on their healer.
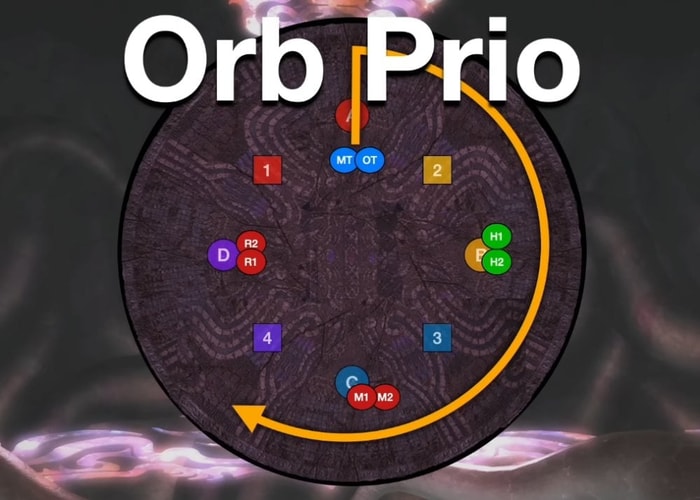
Orb Priority
This priority is relative to where the tanks go: it’s clockwise from the Tanks, Healers, Melees, and then Ranged.
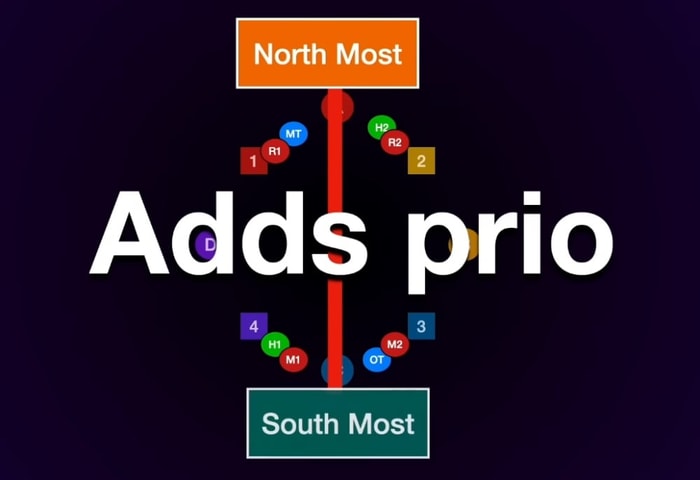
Add Phase Priority: Use pair positions combined with a north/south priority system.
Meteorain
The fight opens with Meteorain, a raidwide AoE that requires standard mitigation and healing.
Naught Grows
The first major mechanic is Naught Grows. This mechanic spawns orbs on one or both healers while the boss simultaneously attacks toward the black hole. Possible patterns include:
- One large orb → full-party stack
- Two smaller orbs → light party stacks
At the same time, the boss performs either a point-blank AoE or a donut AoE.
Point-Blank Version
If the black hole explodes outward, healers drag their orbs into position while:
- Group 1 stands left
- Group 2 stands right
- Everyone faces the boss
The incoming line stacks function as wild charges, meaning the closest player takes heavier damage and tanks must stand closest with mitigation. Healers should avoid standing too close or they risk being clipped by both line stacks. The inner hitbox ring is usually safe.
Donut Version
If the boss uses a donut AoE, the black hole also produces a donut pattern. Players must move toward the black hole instead of away from it. When handling the large orb version:
- Both tanks should be the closest players
- Everyone stacks tightly
- Mitigation is required
Naught Wakes
Naught Wakes simply moves the black hole around the arena before the next mechanic begins. Players can regroup in the center afterward.
Meltdown
Meltdown applies a short pyretic-style debuff called Chains of Condemnation to every player. During this debuff, moving causes massive damage and everyone must remain completely still. As soon as the debuff expires, run to assigned clock spots and max melee range is sufficient. Twisters appear where players were standing, followed immediately by spread AoEs. The boss then uses either:
- Dense Emptiness → light parties
- Airy Emptiness → pairs
If it is Dense Emptiness, group 1 goes west and group 2 goes east. Another Naught Grows follows immediately afterward.
Gaze of the Void
This mechanic reuses the spinning orb patterns from Normal mode. Players should pay attention to how to dodge the spinning cleaves, and which two orbs appear first. The first two orbs determine the new “north” orientation for the second half of the mechanic.
Orb Resolution
As cleaves resolve, black hole orbs spawn around the arena. Two of the orbs will be noticeably larger because those sections were hit twice during the spin mechanic. These large orbs deal heavier damage and must be soaked by tanks. The orbs receive colored tethers:
- Yellow tethers resolve first
- Blue/purple tethers resolve second
Priority System
- Tanks take the large orb
- Healers take the first yellow clockwise from tanks
- Ranged take the first yellow counterclockwise
- Melees take the second yellow
Players must soak in pairs. Solo soaking causes knockback and usually death. Each soak also applies a temporary debuff preventing immediate re-soaking. After yellow tethers resolve, players repeat the same process for blue/purple tethers.
Vacuum
Vacuum creates multiple line AoEs followed by circular explosions. A useful strategy is identify the shortest line AoE, move directly opposite it, and hug tightly near the boss hitbox. Doing this properly automatically dodges both the lines and the follow-up circles. Afterward, players resolve whichever Emptiness mechanic they did not see earlier.
Deep Freeze
For Deep Freeze, Tanks preposition north and the rest of the party stays south. Tanks receive heavy flare tankbusters. Move out beyond max melee, and use strong mitigation. Meanwhile, the party receives a freezing debuff. Everyone must continue moving until the debuff expires. Players who stop moving become frozen, unable to act temporarily and suffering a damage-over-time effect. Another Meteorain raidwide follows. The boss then jumps north and begins the add phase.
Adds Phase
The add phase starts with All for Naught.
Tower Mechanics
Towers can spawn in eight different positions around the arena. Two towers always appear west and two towers always appear east. This allows parties to solve towers consistently using pair assignments - North pair handles northmost tower and south pair handles southmost tower. Players never cross from east to west.
Knockback and Looming Shadow
A knockback circle appears early in the phase. Players may use knockback immunity or simply ride the knockback safely. Avoid standing in the blue circle itself or a giant add will spawn. The primary DPS check is Looming Shadow.
Voidal Turbulence
Four players receive conal AoEs while four towers appear. If DPS receive cones, supports soak towers. If supports receive cones, DPS soak towers. Cone players should stand in positions where towers could have appeared but did not. Resolving towers spawns role-specific adds tethered to the soaking player. Only the assigned player can damage their own add.
Add Responsibilities
- Tanks – Protecting Shadow - Interrupt Drain Touch and mitigate the line tankbuster Weight of Nothing
- Healers – Soothing Shadow - Cleanse the disease debuff from Curse of the Flesh
- DPS – Aggressive Shadow - Dodge Demon Eye gaze attacks- The easiest way to avoid Demon Eye is for everyone to simply face the middle when casts finish.
After all adds die, the party burns down Looming Shadow and Beacon in the Dark. When Beacon dies before the void gauge reaches 100, the party returns to the main arena.
Lightless World and Almagest
The boss becomes targetable again and immediately casts Lightless World, a heavy multi-hit raidwide requiring strong healing and mitigation. This is followed by Almagest, another raidwide that also introduces an additional black hole around the arena.
Double Naught Grows
Phase 2 upgrades Naught Grows significantly. Now players must dodge one AoE from the boss and one AoE from the black hole. One will always be a donut, and the other a point-blank AoE. The combination changes each pull. Players must identify the safe area, stack tightly and keep tanks closest to the orb for wild charge resolution (donut from the boss and point-blank AoE from the black hole). The other pattern forces players far from the boss toward the black hole in the wall.
Naught Wakes AoEs
Black holes now split and fire directional AoEs.
- Double split patterns → middle is always safe
- Other formations create specific safe lanes
Possible safe areas include North/south, Cardinals, and Intercardinals. Afterward, Shrouded Holy creates healer light-party stacks. Another Naught Grows follows, then Dimension Zero, which is a heavy multi-hit line stack requiring mitigation.
Vacuum + Meltdown Combination
This mechanic combines Vacuum movement and Meltdown pyretic. Players must:
- Find the shortest line AoE
- Move opposite it
- Stand still once pyretic applies
- Sprint to clock spots when the debuff ends
Players close to the original stack location should move slightly farther out to avoid twisters. Spread AoEs resolve immediately afterward.
Gaze of the Void (Repeat)
The earlier orb tether mechanic repeats exactly - determine new north, resolve yellow tethers and then blue tethers. Then, another raidwide follows.
Naught Hunts
This is the final major new mechanic. Black holes split and rotate while two random players are targeted by chasing AoEs. The targeted players should:
- Wait for wall AoEs to resolve
- Move clockwise from their black hole
- Continue rotating clockwise while dropping AoEs
The remaining players stay safely in the middle. After several explosions, the orb tethers to a new player.
Common Strategies
Some Party Finder groups send second players counterclockwise. Others use full clockwise rotations. In the full clockwise strategy, new tethered players move ahead of the current target, and both continue rotating clockwise together. Eventually the previous target disengages while the newly tethered players continue. At the end:
- Players dodge one final wall pattern
- Safe zones will either be cardinals or intercardinals
- Finish with either pairs or light parties depending on the Emptiness cast
The mechanic then repeats with the four players who were not targeted previously.
Final Sequence and Enrage
The final portion of the fight repeats earlier mechanics with increased damage:
- Dimension Zero
- Almagest
- Naught Grows
- Naught Wakes
- Deep Freeze
- Naught Grows
- Dimension Zero
- Meteorain
If the boss still lives afterward, it begins a long cast of Almagest. Defeat the boss before the cast finishes or the party wipes.