Welcome to the guide for The Windward Wilds (Extreme) in FFXIV. This encounter features the boss Arkveld, and it’s a mechanically dense fight that rewards coordination and awareness. Luckily, Hector Lectures shared a full guide, breaking down the mechanics and strategies to clear the encounter smoothly. Let’s dive in.
We also want you to know that if you’re struggling to clear or simply want to skip the grind, you can buy FFXIV boost services from MmoGah. We provide cheap and professional Windward Wilds Extreme boost, which is handled by skilled raiders, so you can enjoy your rewards without the stress.
Party Setup
You’ll need two light parties, but instead of the standard melee/ranged split, it’s better to group both melees together to maintain uptime, while both ranged players go out.
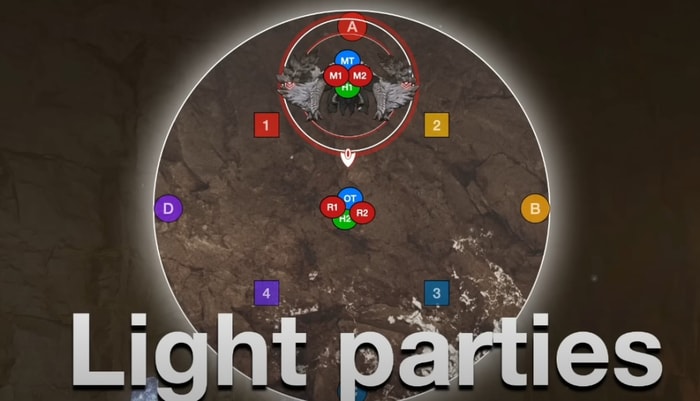
You can handle mechanics as 5–3 stacks, depending on your preference. The off tank can either join the out group or stay in to provide mitigation and maintain uptime. You’ll also need to assign tower soaking positions later:
Main Tank (MT): Northwest priority
Off Tank (OT): Southeast priority
DPS: Intercardinal positions
Healers: Fill wherever needed

Phase 1: Opening Mechanics
The fight starts with the boss crouching — this animation indicates a raid-wide AoE. Heal and mitigate as needed.
Side Swipe Combo
Arkveld will prepare a two-hit side swipe. The first cleave hits the center, followed by a side cleave. Dodge the first hit, then immediately move to the opposite side to avoid the second.
Crack Patterns and Light Party Stacks
Next, the boss jumps to one side, and the arena floor shows white or red cracks:
- White cracks: Dodge out of the center, then move to the side.
- Red cracks: Dodge out, then into the middle afterward.
During these patterns, light party stacks occur:
- Group 1: Stand near where the boss jumps.
- Group 2: Slightly farther out.
You’ll also see line AoEs and puddles under players. Dodge puddles first, then the lines. After resolving both white and red crack patterns, expect:
- Another side cleave
- Another crouched raid-wide AoE
- The Devour AoE pattern (from normal mode)
Devour AoE Pattern
When the boss jumps north and starts channeling this, find the third circle from the center and stand near it. Wait until the boss reaches that circle, then move into it — this position keeps you safe from all donut AoEs.
After this, Arkveld jumps back to the middle and performs another 50/50 cleave. Whichever side the boss raises its wing and swipes — that’s the unsafe side. At the same time, all players will get spread AoEs. Move to the safe side and spread out.
If you must choose between taking the cleave or overlapping spreads, take the cleave, as overlapping spreads will kill both players.
Then, when Arkveld raises its tail, don’t stand behind the boss — it’ll shoot a small line AoE backward. Follow this with a party stack at the edge of the hitbox.
Tower Phase
After another set of cleaves and raid-wides, towers spawn. There are usually small towers near each cardinal and two large tank-buster towers. Tanks should use mitigation before soaking.
Before towers can be taken, there are three sets of puddles:
- First puddles: Bait in the middle
- Second puddles: Bait near your assigned tower
- Third puddles: Anywhere safe — just not on top of towers
After this, soak your towers. Healers can cover for DPS if needed. When all towers are soaked, crystals spawn under them — small crystals for normal towers, large for tank towers. Then, Exaflares will begin moving from the middle outward. Avoid standing near crystals, as they explode when hit by an Exaflare. Players will also get spread AoEs by role, alternating between groups — spread loosely while dodging the waves. After this, you’ll see the text “Guardian Arkveld brings its might to bear”, signaling three raid-wides: two mild and one heavy. Mitigate strongly.
Phase 2: Limit Cut
Phase 2 begins with another raid-wide, followed by the main wipe mechanic: Limit Cut. Each player is numbered 1–8. The boss will tether to Player 1, then dive at them in numerical order.
Diamond Limit Cut Strategy (Recommended)
Each player should move in a counterclockwise diamond pattern around the arena. When the boss tethers to you, run away from the wing that’s extended. This ensures the cleave direction is away from the group. Player 1 runs to D, Player 2 continues counterclockwise, Player 3 to B, and so on, forming a loop.
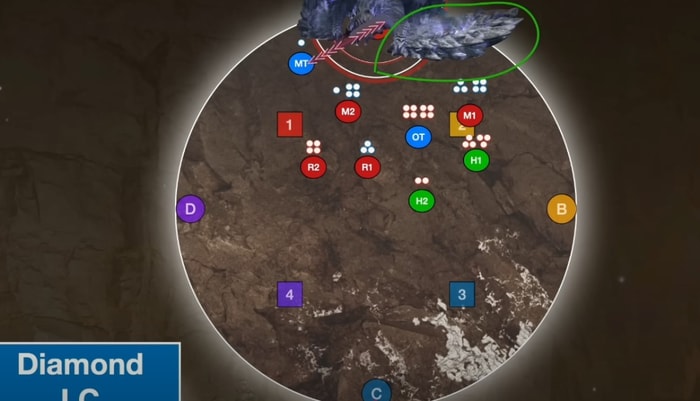
As each player is targeted, step slightly forward after being hit to avoid cleave overlap. If the boss’s wing starts on the opposite side, Player 1 instead runs to B, and the loop rotates clockwise. Done correctly, Limit Cut becomes simple and consistent.
After Limit Cut, another raid-wide occurs, followed by another tower phase resolved exactly as before.
Laser Mechanic
A new mechanic follows: Lasers. One player is marked, and a chasing laser targets them, destroying any crystal it passes. To handle this:
- Identify the large crystal closest to the boss.
- The marked player moves toward that crystal, while the rest of the party goes to the opposite side.
- Once the telegraph appears, the marked player crosses back to the group — the crystal explodes harmlessly away from everyone.
Subsequent lasers repeat this with light party stacks:
- Group 1: In
- Group 2: Out
Then a third laser appears — simply cross again and loosely spread for AoEs afterward.
Final Phase
The boss repeats earlier mechanics:
- Exa AoEs (vertical + horizontal)
- Side cleaves
- Devour pattern
- Spread + Tail Swipe + Stack combos
- Towers with puddles
The final new mechanic involves Exa waves appearing two at a time. They move across the arena and detonate crystals on contact. To handle this safely, stand along one of the last Exaflare lines that spawn, away from any crystals. After this, Arkveld loops through familiar mechanics for several minutes. Eventually, you’ll again see “Guardian Arkveld brings its might to bear.” Push your DPS and defeat the boss before the final raid-wide, or it’s a wipe.
Conclusion
The Windward Wilds (Extreme) is a long, pattern-heavy fight emphasizing clean positioning, awareness, and party coordination. Once you master the Limit Cut and tower phases, the rest of the fight is mostly repetition. Stay calm, call mechanics clearly, and Arkveld will fall before your team’s might.