Things to Prepare
Before starting Brelshaza Legion Raid gate 6, you need to prepare some battle items: Time Stop Potion, Whirlwind or Dark Grenade, and Swiftness Robe or Marching Flag. Time Stop is needed since you can die from the field. Classes that have low stagger are recommended to hold Whirlwind Grenade. Other classes can hold a Dark Grenade to push the DPS. Swiftness Robe or Marching Flag can help you do certain gimmicks easier.
Major Gimmick
When you enter the raid, the boss will have 250 Hp bars, and you will die by falling out of the field.
Hallucination Space
Around 210 HP bar, the boss teleports to the center and isolates all eight players into a hallucination space. Each player will see different shapes on the screen: Circle, Diagram, Triangle, Square, Pentagon, Hourglass, Octagon, and Star. All players have to memorize what their shape is. At the same time, the boss will shoot missiles, so stay on the back side of her to avoid them.
You can see a debuff mark above your character and the Mana bar, called the pointer reverse debuff. Your character will move to the opposite side of where you click, and then she will show safety zones three times in a row. You have to hurry to all three safety zones. On the second safety zone, the pointer reverse debuff disappears and applies back again on the third safety zone. So you should concentrate and move to the safety zones, clicking on the correct side. Players who fail to go to the safety spot will be guaranteed killed.
You should also memorize the safety zone directions. Like the shape is star, and the safety directions are seven, zero, and eleven. Zero means the center is safe. If you survive in the isolated space, players will gather back, and the boss will start to shoot missiles everywhere. If you stay close to her front, then you will be able to see one of eight shapes. Players who saw the revealed shape should let all players know what the shape is. Then the player with that shape in the isolated space has to reveal the directions of the safety spots since all the players will have to move to those spots again. The boss doesn't reveal the shape of the player who is already dead, but she can show that shape if the player dies in the isolated space. This means that player will not be able to memorize his safety directions, and other players have to start guessing the spot. If the boss shows a heat shape, it will most likely be a raid white. If everyone survives, that's the end of the gimmick. The raid leader normally uses a Xena after the gimmick to deal the damage.
1ST Yellow Meteor
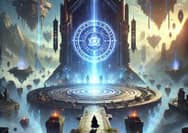
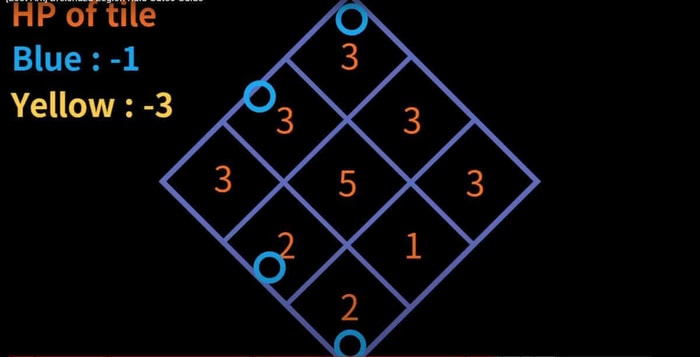
About 188 hp bar, you will see a cutscene of her striking meteors. All players have to gather in a 12 o'clock direction, and then eight meteors will be assigned to players, yellow for the first one, blue for the other seven players. They will strike the tile where you are after a few seconds. The meteor gimmick is very important, and all of you have to understand since this gimmick happens a lot until she is taken down. It's the key gimmick for the whole run.
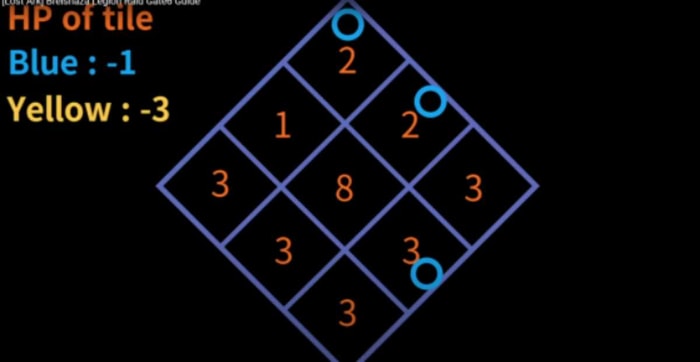
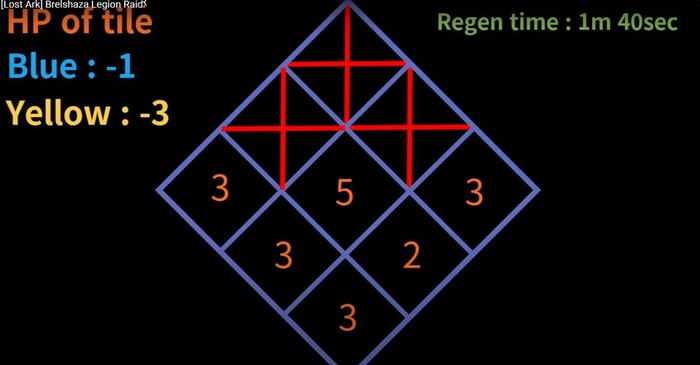
There are nine tiles in this gate. Each style except for the standard tile has 3 HP, and the center tile has 14 HP. Blue meteors reduce 1 HP on the tile where it strikes. Yellow meteor reduces 3 HP.

When the tile HP becomes zero, then it gets destroyed. And you can die by falling when you get knocked out of that place. You can visually tell how much HP the tile currently has. When more than three tiles are destroyed, the boss wipes the raid. But the yellow meteor has a larger range of the hitbox compared to the blue. So you want to put a yellow meteor on the end of the vertex side since it only strikes three tiles in this way, which will avoid the wipe.
The first meteor signs at 188 HP bar. The first meteor is yellow, and the other seven are blue. The players get assigned in random order. The faster you get to the meteor, the faster it falls. But the yellow one will be the last one that will fall in this gimmick since it takes longer for it to fall. The first person who got the yellow meteor dropped is at the end of 12 o'clock, second and third blue in the 12 o'clock tile as well, fourth, fifth and sixth in the 11 o'clock tile, and lastly, 7th and 8th in the 1 o’clock tile. You split like this because, for instance, if all players gather in the 12 o'clock tile, then the meteors will all strike that tile. And since the time of the meteor for every player is different, players who have later numbers will not be able to evacuate because first, second, third, and blue meteors will break the 12 o'clock tile. And later numbers will die by staying there before they can even drop their meteors. Therefore the safest and the more optimized way is splitting.
As soon as your meteors start to fall, you have to spacebar to other tile, except for 11, 12, 1 o'clock tiles since they will get destroyed. You will die if you stay on those tiles. If everyone survives, then that's the end of the gimmick. The tiles regenerate after 1 minute and 40 seconds from the destruction. And you have to check the time of the destruction by typing the berserk time of the boss. For example, the berserk time points to 17 minutes 17 seconds, so you type this time minus 1 minute and 40 seconds, which is 15:37 in the chat. From now on, blue meteors will be assigned to random players for every minute. The amount of meteors assigned to the players grows from 2 to 4 and starts again from 3 when it reaches 4. You have to drop the meteors on the tiles, but the problem is you don't want to destroy other tiles when three tiles are not regenerated yet because that would only wipe the raid.
2nd Yellow Meteor
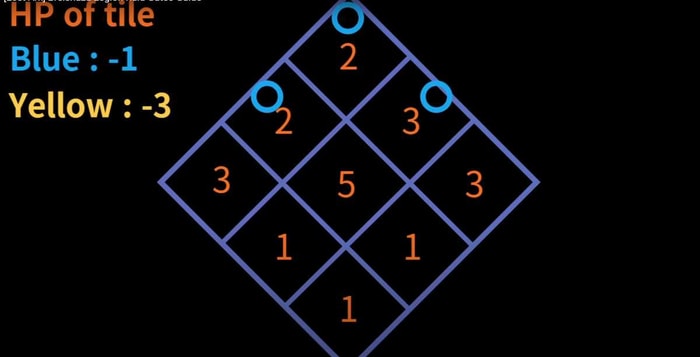
Blue meteors are not the only thing you have to consider. You also have to see four yellow meteors in total in one run. Unlike blue, yellow meteors get triggered upon the boss's HP, not the time. The first yellow meteor already happened at 188 HP bar, and the second yellow meteor will be assigned at 137 HP bar. The person who got assigned has to move all the way to 6 o'clock direction and drop the meteor, which will destroy three tiles in the bottom. Here is why you must check the time whenever the yellow meteor destroys the tiles.
If your party DPS is fast enough to take your HP down to 137 from 188 in one minute and 40 seconds, then your raid will be wiped because the second yellow meteor will be assigned even before the regeneration of the top tile. Therefore you have to type the destruction time just in case to stop DPS if your party DPS is too strong. For the second yellow meteor strike, you have to minus one minute from the berserk time.
Here is the reason for the next gimmick. You will see four blue meteors, which you can split on the top side like this.

One thing that you can notice is that three and nine o'clock tiles are not used. The reason is that you want to save these two tiles as much as possible as spare tiles, since the party will most likely wipe if both of the tiles already have low HP when you consider the yellow meteor that will guarantee to destroy three tiles. You want to use 3 and 9 o'clock tiles in a very urgent situation when you cannot reach the correct tile in time. Next, it would be best if your party could take your HP to 113 before the next blue meteors get assigned. If not, it's still okay. Because the amount of blue meteors will start from 3 again, you can drop it like this.
Giant Mommy
At about 113 Hp bar, the boss teleports to the center, and cussing happens. By the way, all the tiles must be regenerated for this gimmick. But because the cussing is long, it's okay to check regeneration time by subtracting only one minute. Since cussing is also included in the time, the blue meteor timer will not be applied until this whole gimmick ends. After the cussing, you will have to dodge two times of every attack by staying in the shrinking circle. Then when she holds her hand, space bar to the direction of your number, party 1 times 3, party 2 times 3 plus one. Black hole will be generated in the center trying to pull your players. And it will guarantee to kill you if you get hit by it.
There will also be a few yellow and a lot of red orbs pulled to the center with insane speed. If you get hit by red orbs by three times, then that's a guaranteed kill. Since it's not easy to avoid, the raid leader normally uses shandy right after players find their edition to slow down the speed of the orbs. There will be four black orbs, one each, and four random tiles where the players are. So the rest of 4 times will not have these black orbs. Players who have the black orbs in their position have to take at least one yellow orb while dodging all the red orbs. Players who don't have black orbs in their position have to take two yellow orbs while touching all the red orbs. After a few seconds, the black orb will start to shake. This is when the player in that position touches the black orb. Soon everyone else who didn't touch the black orb will be dragged into the center, and teleported to a yellow field. Players who are on the blackboard will stay where the boss is.
Touching the black orb before it starts to vibrate will kill that player. Also, not having enough amount of yellow orbs will kill the player as well by the time group gets spitted. So if no one dies, four people should be in the yellow field, called the inner side. And the other four should be with the boss, the outer side. There will be clones in each direction of the outer side, so eight clones in total. Four players have to browse around and touch the clones. There will be two clones that will either turn clockwise or to counterclockwise direction. You have to ping the tiles where the clones turned to let people in the inner side know.
On the inner side, after several seconds, the two clones will appear in those exact directions. If the clone turns clockwise on the other side, then the players in the inner have to stagger that clone. If it turns in the counterclockwise direction, the players on the inner side have to counter that clone when she holds her hands. When you succeed the stagger and counter on each clone, they will drop a yellow orb that will protect the inner side from the guaranteed kill attack later on. So two orbs will be dropped, one from each clone, and two players have to take them. After several seconds, the clones will be generated again on the other side. And the players have to browse again to find two more clones. Ping the tiles where it turns, and let the players on the inner side succeed the stagger encounter. The rest of two players who didn't take the yellow orbs should take the rest of two orbs. So all four inner side players having the orb will prevent them from the guaranteed kill, and they will eventually come back to the other side, which is the end of this whole gimmick. The raid leader uses azena after this gimmick resolves. Failing the stagger or counter on the clone will not generate the yellow orb, and a blue meteor will fall on that tile reducing its HP. So if that tile had only one HP, it would get destroyed, killing the players standing on it, regardless of the inner side and outer side.
3rd Yellow Meteor
After one minute, blue meteors will be assigned again. You can split them in the bottom part, or you can overlap them on one tile of the top side, which only has 1 HP, except for 12 o'clock.
The reason is at around 87 HP Bar, yellow will be assigned. And the player has to drop it on the 12 o'clock vertex. If you overlap the blue meteors on 11 o’clock, like in this case, you can make the bottom part clean. And it will not matter on yellow meteor anyways, since if you put it on 12 o'clock, it will destroy only two more tiles, which is 3 in total.
The last yellow meteor happens at around 37 HP Bar, so for the next meteors, you can split them on the bottom side like this.
And for the next ones, you can split them like this.
If you see other blue meteors, you can drop them like this.
As you can see, the key point of dropping meteors is not to destroy the tiles when three tiles are already destroyed.
Twister
At around 62 HP bar, the boss cements twisters moving to one direction. At the same time, some of the players will have Mark above the Mana bar. Players with the mark have to dodge the Twisters since it will raise the mark with huge damage. It's important to keep the mark since after several seconds, players who keep their mark will be teleported to another space where the object is. You have to destroy this object. Or it will generate a large range of black hole that hinders the player's movement.
4th Yellow Meteor
About 37 HP bar, yellow meteors will be assigned. And the player has to drop it on the 6 o'clock vertex. In this case, the last yellow meteor and the blue meteors will be continuously assigned to the players until the end of the raid. So you have to keep splitting the blue meteors by not destroying the tiles.
Hallucination Space
At around 28 HP bar, the boss will do the Hallucination chemical game. The blue meteor timer will not be applied during this gimmick. Unlike the previous hallucination gimmick, three tiles are destroyed. And the pointer reverse debuff will be applied in a random sequence, making it harder to survive. The raid leader normally uses Inanna here since she removes the pointer reverse debuff on all players. Memorize your shape and save the direction by surviving the gimmick, and follow the direction of the shape revealed afterward.
3 Tile Destruction
At around 25 HP bar, the boss destroys the tiles in each time three directions. You have to combat her in the smaller field. From now on, there won't be a raid wipe until you take her down, even if more than three tiles get destroyed.
Above is the all-major gimmick.
Normal Patterns
There are some important normal patterns. Most of them do lethal damage when you fail to dodge them. So make sure to be ready to use time stop whenever you can.
In Raising Lines
Some players get lines, and others get spikes. The spikes have to rub their character on other player's line and take it. If not, a giant meteor will fall on the player who has the line, which does a lot of damage.
Balls Gathering
Several players have balls have to stick together. Others who don't have must stay away from them since it will explode and do a lot of damage. If balls fail together, that will also cause massive damage.
Gather and Split
One person will get a red circle. All the players have to stick to it. After several seconds, someone else will get a larger circle. Players who have do not have to move away since it will explode and do a lot of damage to others. Then other players will have to gather again in the large circle. If not, players will get massive damage.
Spike Circle
A circle that has a spike will move around the field. After several seconds, it will attack where the spike is pointing, which knocks players out.
Scythe
A circle with a red telegraph appears, and you have to go inside the circle since the scythe will knock out players on the other side with bleed damage.
Glass
The boss will summon a glass looking field that has safety zones. At the same time, a yellow beam points to a random player. That player has to dodge the beam to a place that is not the safety zone since the beam knocks out players, dash into the safety zone afterward.
Grab
The boss grabs the front. If players get grabbed, they will be knocked out during the AOE attack on the back side of the boss. If no one is grabbed, she will do AoE on the front.
Counter
The boss either rushes or teleports. This pattern is able to counter on the second rush, or when she appears.