When it comes to Final Fantasy XIV, we all know that Housing system is one of the most important features. Almost all players want to have their own houses, and decorate them according to what they like. Therefore, Mmogah (No.1 ffxiv gil selling website in google) will be glad to share some decoration guides written by some professional called Dancetwist and hope to help improve your sytles.
1. Basic Controls: The Hosing Menu
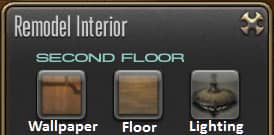
The starting point for most house owners is the Remodel menu, which allows you to change structural elements of a room like wallpaper, flooring, and lighting. All items used here are single-use only, but you can preview the results (and even interact with them) before confirming the changes.
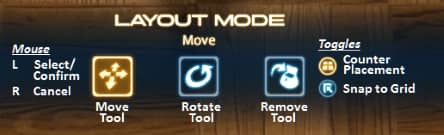
The interface that we’re most interested in is the Housing menu, which offers a variety of tools to place all the elements of your decorating project. The primary ones are the Move Tool for X – Y – Z placement of items in valid locations, the Rotate Tool for spinning items on either the X or Z axis depending on type, and the Remove Tool for picking items up again.
Two additional options are available, and these serve important roles in a lot of advanced decorating projects. The Counter Placement toggle determines whether your Move Tool will look for valid surfaces (such as counters or walls) to place objects on or bypass those to place on the foundational floor and walls of the room. The Align to Grid toggle will switch between precise or grid-based mouse movements with the Move Tool and Rotate Tool. The grid can be helpful for aligning furniture consistently, but decorating often needs a finer touch.
2. Floating Furniture
Eligible Items:
Tabletop
Wall-Mounted
Steps to Perform:
1) With Counter Placement enabled, use the Move Tool to place an object on a table, wall, or other surface (non-foundational)
2) Disable Counter Placement
3) Select your object, then Cancel it
4) Use the Move Tool to pull away the table or wall before turning Counter Placement on again
Decorating Result:
Your object should remain floating in the air, right where you placed it! While this may seem like a simple trick, it opens the door to a lot of creative combinations that wouldn’t be possible otherwise—so think of this as your biggest tool as a decorator!
3. Levitating to Any Height
Eligible Items:
Tabletop
Steps to Perform:
1) Set up a Floating Object as mentioned in the previous technique
2) After removing the table, enable Counter Placement
3) Use the Move Tool to place a shorter table or wall shelf at a location below your object
4) Select your object, then Cancel it. Your object should now highlight when you mouse over the table or shelf below it
5) If other objects you don’t want to move also highlight, disable Counter Placement and Select, then Cancel each one individually. These will reset if you exit the Housing menu
6) Use the Move Tool to reposition your table or shelf until the object reaches the desired position
7) Use the Floating Object technique to remove your table or shelf
Decorating Result:
When you place the shorter table or wall shelf under your floating object, it will re-link with the surface and behave like you just placed it on top—even though it’s still hovering above! By repeating this process a few times, you can use it to extend items anywhere you want in a house including staircases, ceilings, upper-stories of large rooms, and more.
4. Sit here? Sit There!
Eligible Items:
Tabletop (solid)
Furnishings
Outdoor Furnishings
Steps to Perform:
1) Pick a solid furnishing you’d like to use as the target, plus a chair or bed of smaller size that can be hidden inside of it
2) If using a chair, place it so that the centerline of the chair lies inside the furnishing
3) If using a bed, place it so that the centerline for where a character sleeps on it lies inside the furnishing
4) Adjust both items until the chair or bed is suitably disguised from view
Decorating Results:
Next time you feel like relaxing, just /sit near your target furnishing to sit directly on it! Your character will interact with the furnishing exactly as if it were a chair or bed instead. You may need to test it out a few times to find the comfiest spot, but it should work for any character race or height if you follow the blueprints below.
5. Snap-Behind for Walls
Eligible Items:
Wall-Mounted
Steps to Perform:
1) Pick a target location on any foundational wall that is blocked by fixed features, such as a door, window, or pillars
2) Use the Move Tool to place a partition close to that location, then put a wall-mounted object on it. Adjust until it is at the same height as your desired location
3) Use Rotate Tool to set the partition to the desired angle for your wall-mounted object. Any wall-facing angle (
4) Reposition the partition as close as you can to the foundational wall with the desired location at a distance straight behind the wall-mounted object
5) Use the Floating Object technique from our first guide to remove your partition
6) Briefly exit the housing interface
Decorating Result:
When you exit the housing interface, the wall-mounted object will attempt to “autosnap” back to the foundational wall if it was Floating close enough. Fixed features are entirely ignored when it does this, so the wall-mounted object will now be set inside the window, door, or pillar as if it was a normal wall! The Move Tool can’t make positioning adjustments inside a fixed feature, so any corrections you want to make on the final location will require retrying from the partition.
6. Walls? What Walls?
Eligible Items:
Wall-Mounted
Steps to Perform:
1) Use the Move Tool to place a partition at a convenient location, then put a wall-mounted object on it. Adjust until it is at the desired height
2) Use Rotate Tool to set the partition to any desired angle for your wall-mounted object
3) If it is a wall-facing angle (
4) Use the Floating Object technique to remove your partition, then use the Rotate Tool to set that partition at a steep angle to the wall-mounted object (=/= 90 degrees)
5) Reposition your partition behind the wall-mounted object based on these two criteria so that it will re-link to the wall surface:
(A) The partition does not overlap with the center of your wall-mounted object
(B) The “anchor path” of the wall-mounted object touches a valid placement location on the partition. This path extends from the centerpoint out to a set distance behind the back surface of any wall-mounted object, so it can vary significantly in size
6) Enable Counter Placement, then Select your object and Cancel it. If both criteria were met, then the wall-mounted object should now highlight when you mouse over the partition
7) Use the Move Tool to relocate your partition and wall-mounted object to the desired position. This can be anywhere within reach of the partition placement
8) Use the Floating Object technique to remove the partition a final time
9) Briefly exit the housing interface
Decorating Result:
If you chose a wall-facing angle to combine with the Snap-Behind technique, then the wall-mounted object will attempt to re-align with the foundational wall if any part of it is inside the autosnap region (excluding the anchor path). Otherwise, your object will remain Floating at your desired angle regardless of where the foundational walls or other surfaces are at!
7. Tumbling All Over!
Eligible Items:
Tabletop (via a wall shelf)
Steps to Perform:
1) Use the Move Tool to place a wall shelf at a convenient location, then put one or more tabletop objects on it
2) Place a Glade Partition near your desired location for the tabletop objects, with one of the shorter sides facing South according to the map compass. This surface will become an “angle zone” we can use to special effect
3) Enable Counter Placement and use the Move Tool to pick up your wall shelf, but continue holding onto it during all the following steps
4) Hover the wall shelf over the South-facing edge of the partition. If the edge is at the right angle, your shelf should be showing an upside-down orientation for most heights on it. Adjust the wall shelf until your tabletop objects are at the desired location
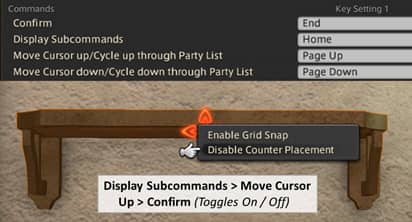
5) Disable Counter Placement. Since your mouse is busy (holding the shelf), we recommend setting some convenient keybinds for the sub-command menu for this step:
6) When the tabletop objects are no longer highlighted, Cancel your wall shelf placement
Decorating Results:
Your tabletop objects should stay right where you positioned them—and still be upside-down! The tabletop objects are now in a special ”semi-persistent” state where you can see and interact with them, including /gpose and screenshots, but they’ll eventually revert to their original positions on exiting the zone. This can unlock all sorts of creative design ideas, but there’s still a lot more you can do with it!
Steps to Elaborate (Optional):
7) Instead of placing a Glade Partition, use the Move Tool to hover your wall shelf over all sorts of surfaces around the foundational walls and fixed features of your house. The layout varies for each house size and residential district, but many features will produce their own angle zones at a variety of different orientations!
8) Once you have identified an angle zone of interest, hover the wall shelf over it again so that it is showing at the angled orientation
9) If you can draw a straight line from the orientation to your desired location, estimate the distance required and Cancel shelf placement
10) At the original positions, use the Levitating technique from our first guide to raise your tabletop objects approximately the same distance above the wall shelf. Return to hovering over the angle zone afterward
11) If your desired position is still out of reach from the angle zone, position your camera so that either the floor, a set of stairs, or the ceiling appear directly adjacent to it
12) Use the Move Tool to drag your wall shelf from the angle zone onto one of these surfaces. If you avoided touching any other wall surfaces, the wall shelf should “transfer” over to it while still showing an angled orientation
13) Reposition your wall shelf along the new surface until your tabletop objects reach the desired position. You will need to avoid touching any walls or fixed features while doing this, but you can “transfer” to other floors, stairways, or ceilings multiple times if needed
14) Once you’re there, disable Counter Placement and Cancel your shelf placement. It’s done!
In the last, I want to remind all players who want to own their well-decorated houses of saving enough gil in Stormblood. For those who have enough time, you can grind your gil in person, but for those who have no time, you have to buy gil from the reliable and professional gil selling website. If you are the latter one, you could read the relating news which maybe help you.
Relating News:
https://www.mmogah.com/news/ffxiv/why-buy-gil-before-stormblood
https://www.mmogah.com/news/ffxiv/how-to-buy-the-cheapest-ffxiv-gil-from-mmogah
https://www.mmogah.com/news/ffxiv/where-is-the-best-place-to-buy-safe-ffxiv-gil